Disclosure: This content may contain affiliate links. Read my disclosure policy.
If you’ve found learning how to use a compass intimidating, this guide simplifies the journey and makes each step along the way a confident and enjoyable one.
The first time I navigated by compass was on January 17, 2021. It was so easy, I couldn’t believe it! On a solo winter bushwhack, I set a bearing beside Biscuit Brook in the Catskills, stepped off the trail, and headed directly up Fir Mountain. I didn’t have to tweak my compass until I got to the summit. Huge success! First time out of the gate! If I can do it, you can do it too.
Like most people, I’d always been too intimidated to learn how to use a map and compass to navigate. Turns out it’s actually super easy; the problem is usually how it’s taught.
This post takes a non-jargon-based approach that will walk you through the whole process, step-by-step.
Basic Map & Compass Skills Make You Feel Amazing
The sense of freedom, self-reliance, and the thrill of exploring uncharted territory become more than just skills; they become the gateway to unforgettable adventures and the joys of self-discovery.
Knowing your map and compass navigation basics means…
- You’ll never feel lost again — in fact, you’ll become instantly un-get-lost-able;
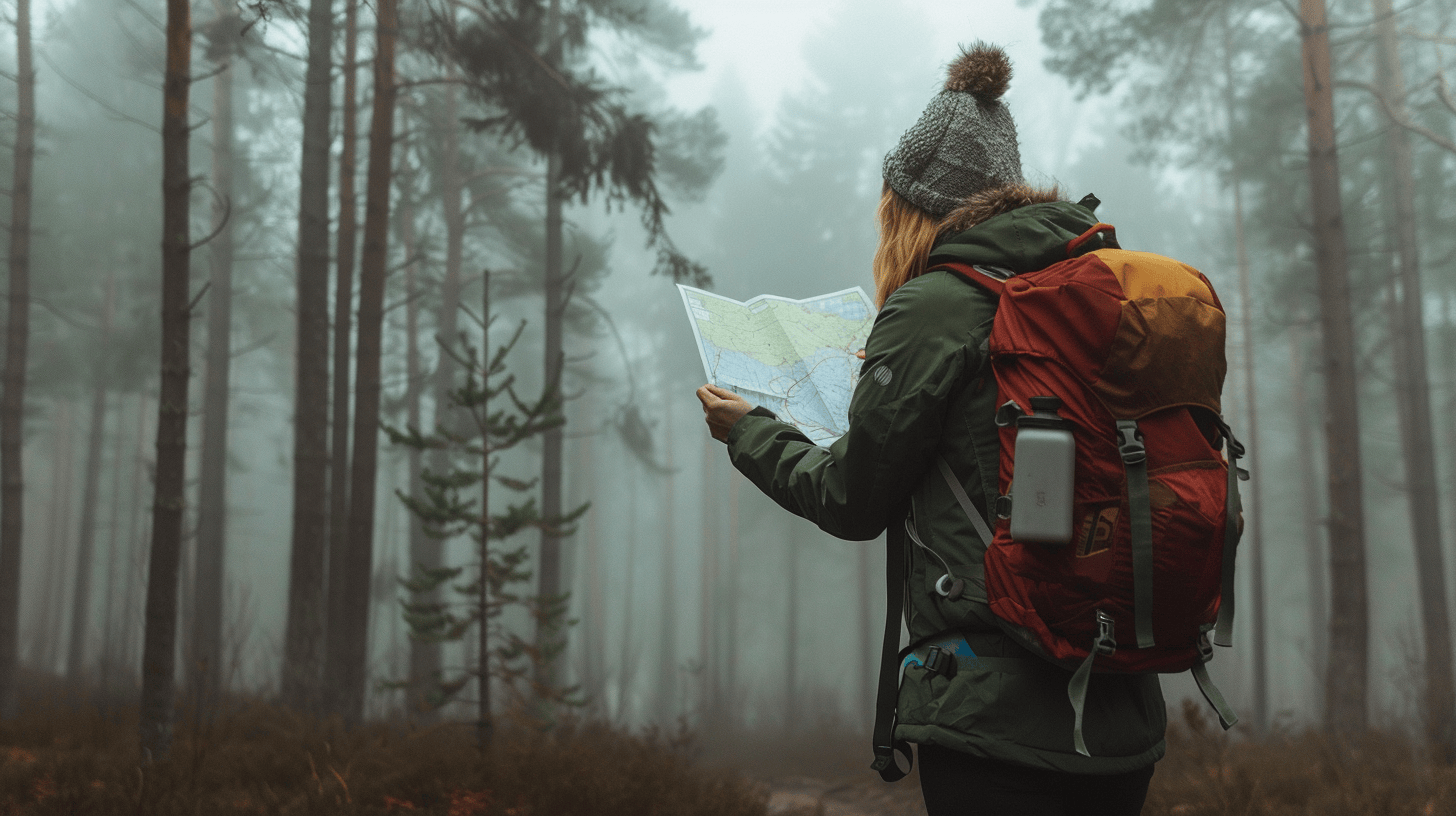
- You’ll be able to hike in a straight line through even the densest fogs and forests;
- You’ll feel a much deeper connection to the terrain around you;
- You won’t have to rely on a smartphone for backcountry navigation;
- You’ll feel 100 times more self-reliant. You will not believe the wonderful sense of freedom and accomplishment that comes from navigating with map and compass.
Learning How to Use a Compass is EASY!
You can learn how to use a compass in minutes. You will learn it in minutes. There are only 4 simple steps…
- Orient your map and compass;
- Set a bearing;
- Hang the compass around your neck;
- There’s no fourth step!
LOL. Let’s walk through it, step by step. Afterwards, we’ll get into the gear, the jargon, and the nuances. For now, I just want to show you how easy it is…
Note: This guide is focussed solely on how to set a bearing and navigate with a compass. It does not teach important map reading skills — i.e. interpreting map symbols, contours, etc. — which are, comparatively, much easier to learn.
How to Use a Compass for Hiking
Mastering the art of map and compass navigation opens up a world of possibilities for hikers and outdoor enthusiasts. It’s not just a skill; it’s a key that unlocks the beauty and wonder of the great outdoors. How do you use a compass step by step? Here’s exactly how…
STEP 1: ORIENT YOUR MAP & COMPASS
Your first step is to make sure that your map, your compass and your body are all facing magnetic north.
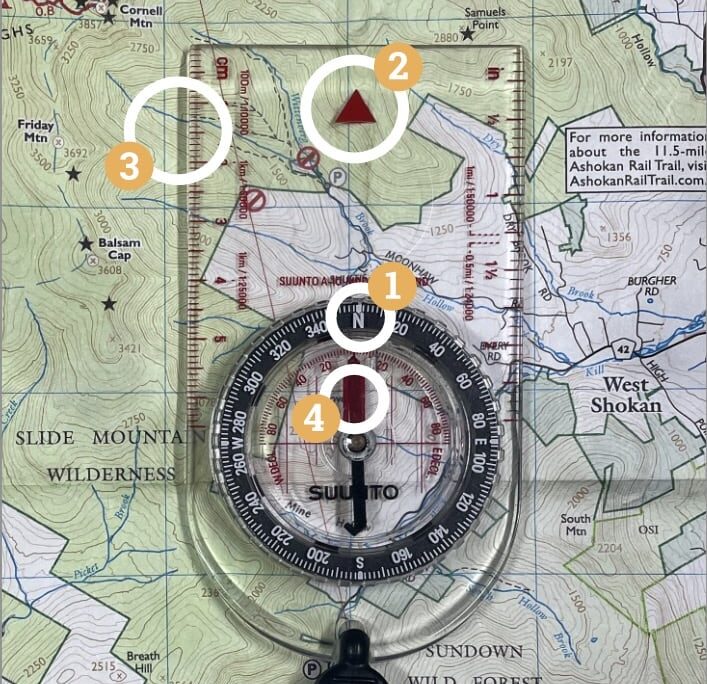
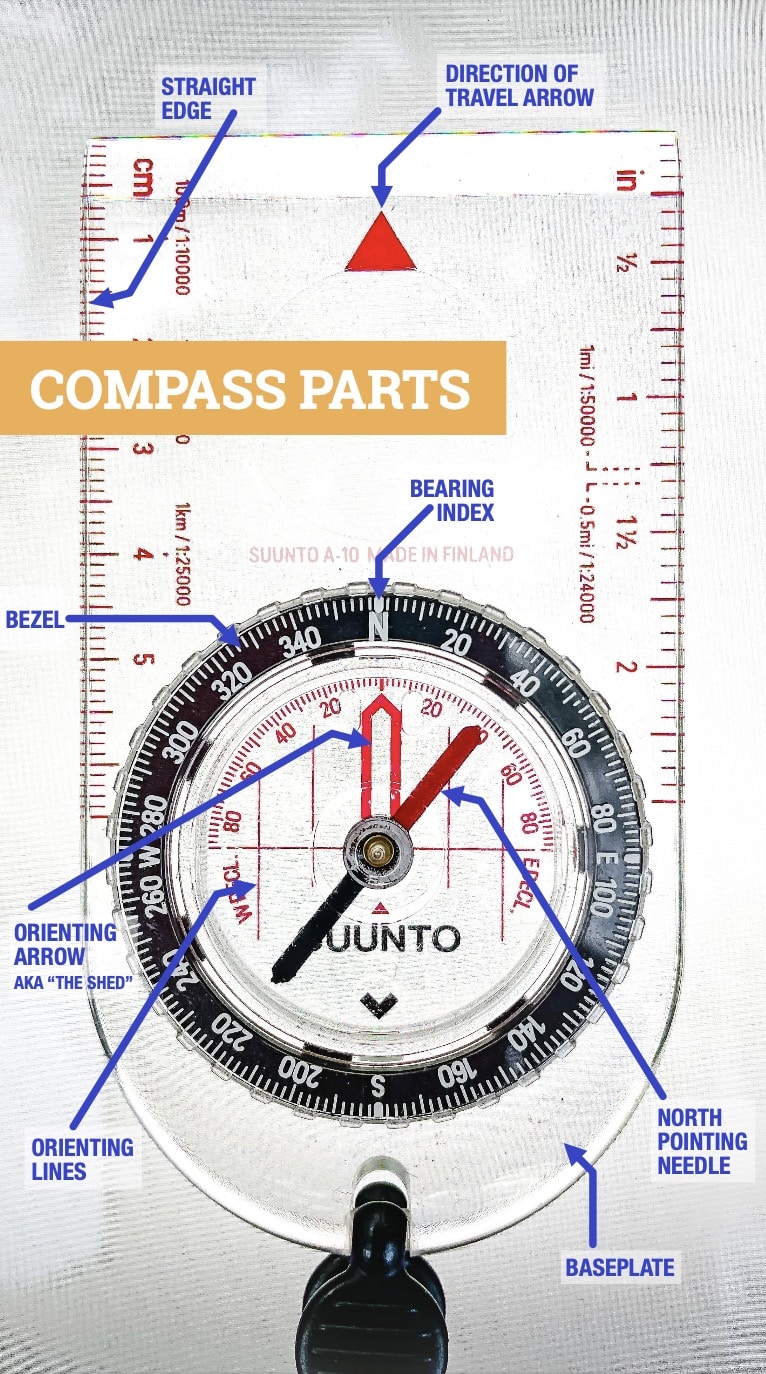
Turn your compass dial until it shows N at the index mark1 under the direction-of-travel arrow2.
Line up a side edge of your compass with the map’s vertical gridlines3.
Next, holding the map and compass, turn your body until the red arrow is inside the red “shed”4.
Now that “red is in the shed”, you, your map, and your compass are all facing magnetic north.
Get access to hyper-detailed trail guides, insider tips, and expert advice. Join a vibrant community of like-minded hikers, receive exclusive content, and embark on unforgettable outdoor adventures. Whether you’re a seasoned outdoor enthusiast or just starting out on your hiking journey, this website provides invaluable resources to help you explore the best trails in the Catskills, Adirondacks, Hudson Highlands, Berkshires, and beyond. Get access now to all content on this website instantly and enjoy unique supporter benefits.
STEP 2: TAKE A BEARING
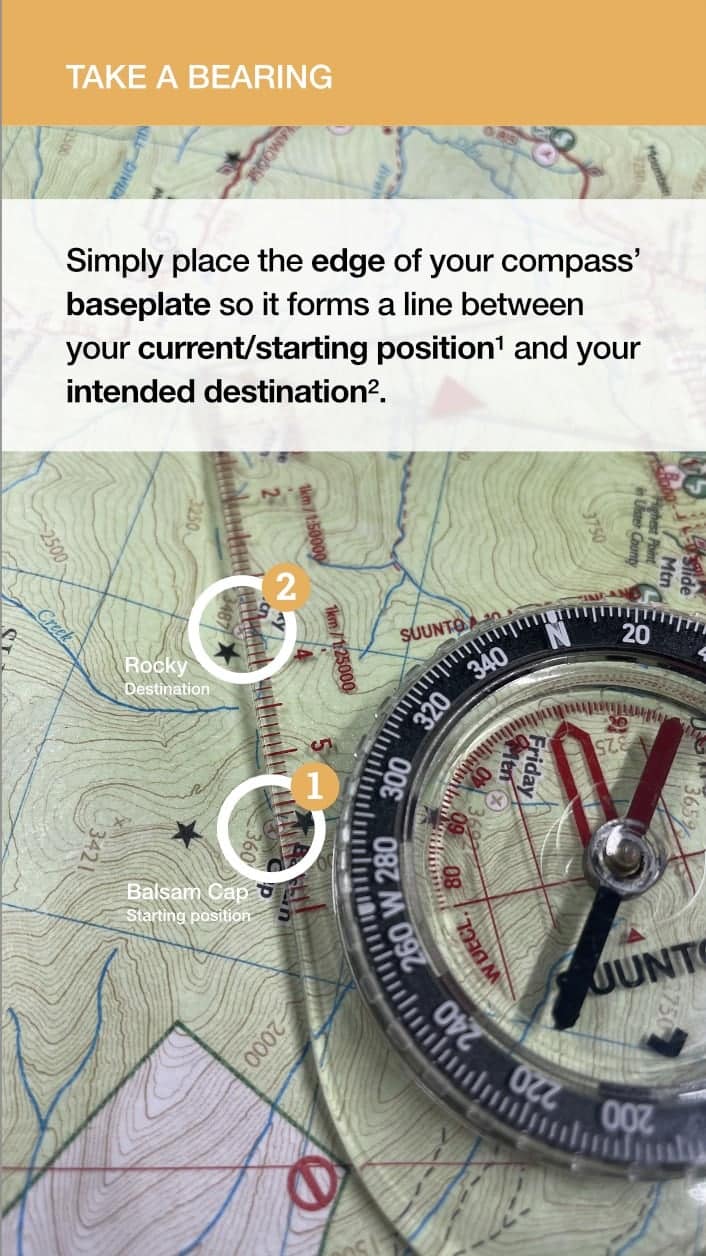
In this example, we’ll set a bearing between the summits of Balsam Cap and Rocky mountains in the Catskills.
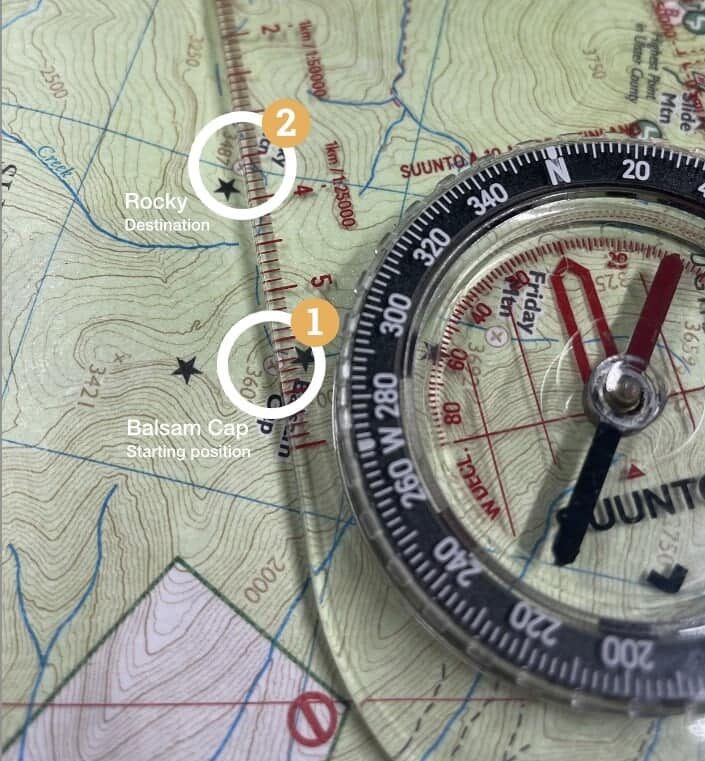
Simply place the edge of your compass’ baseplate so it forms a line between your current/starting position1 and your intended destination2.
While keeping the compass tight against the map — so it doesn’t shift — turn your compass dial until the red orientation lines on the dial are facing north and are once again parallel with the vertical gridlines on your map.
In this example, your initial bearing, visible at the index tick, would be 247°.
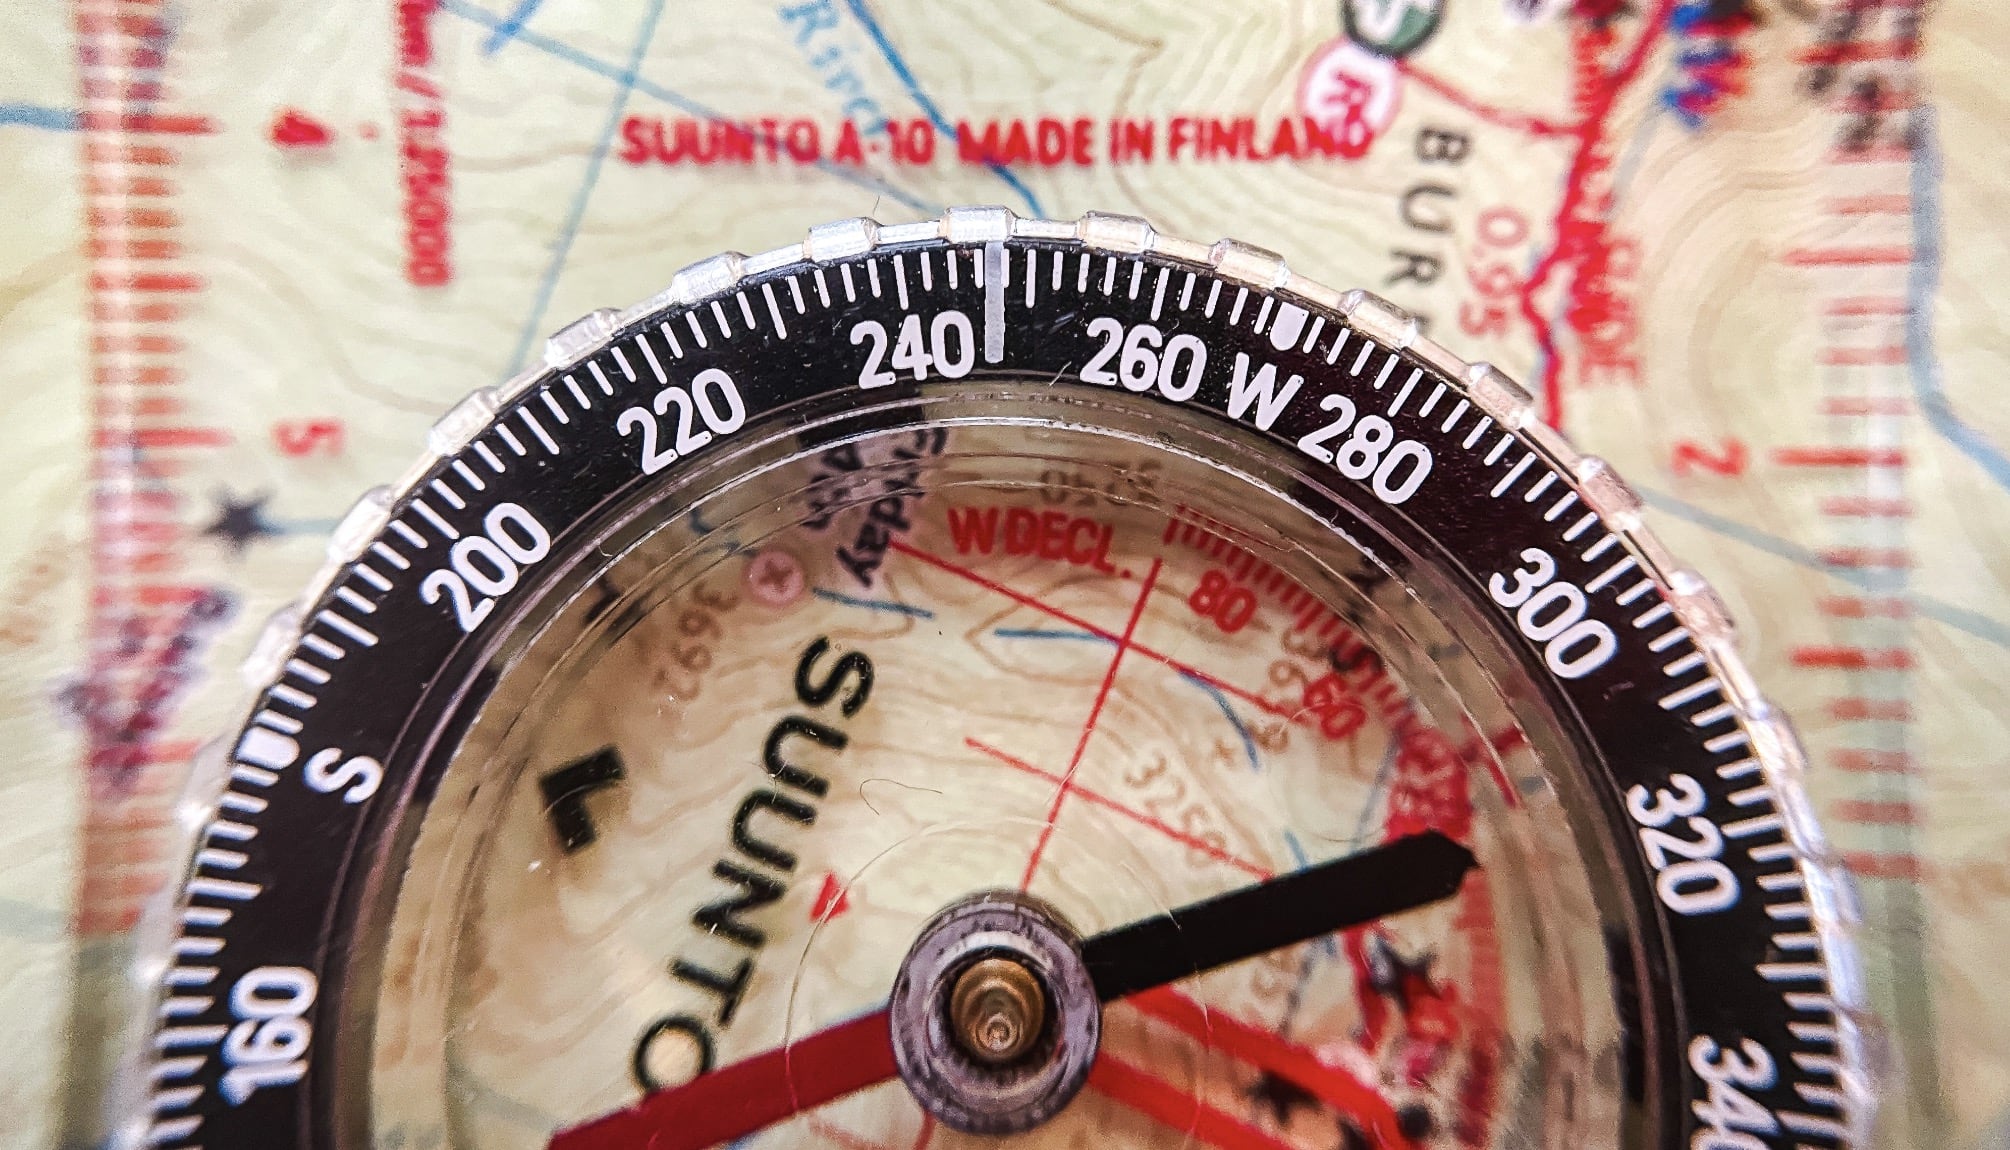
Adjust your bearing…
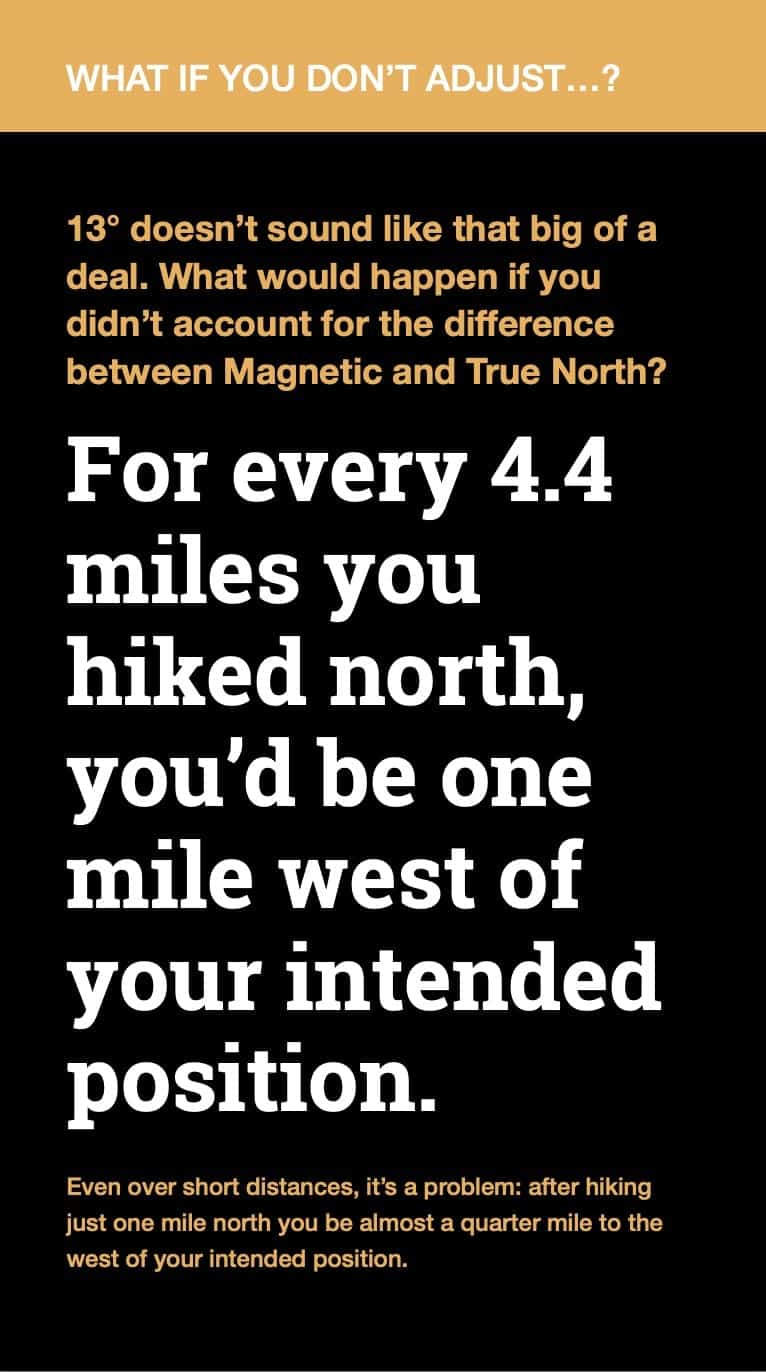
If true north and magnetic north were one and the same, you would now be finished and ready to set off.
Usually, they are not, and because they are not we have to make a small adjustment to account for the difference between the two.
This is the part that confuses people the most. But it’s easy…
Every topographic map includes the key you need. Near the edge of your map, look for a small diagram like the one below which will tell you that (in our example area) Magnetic North is 13° west/left of True North.
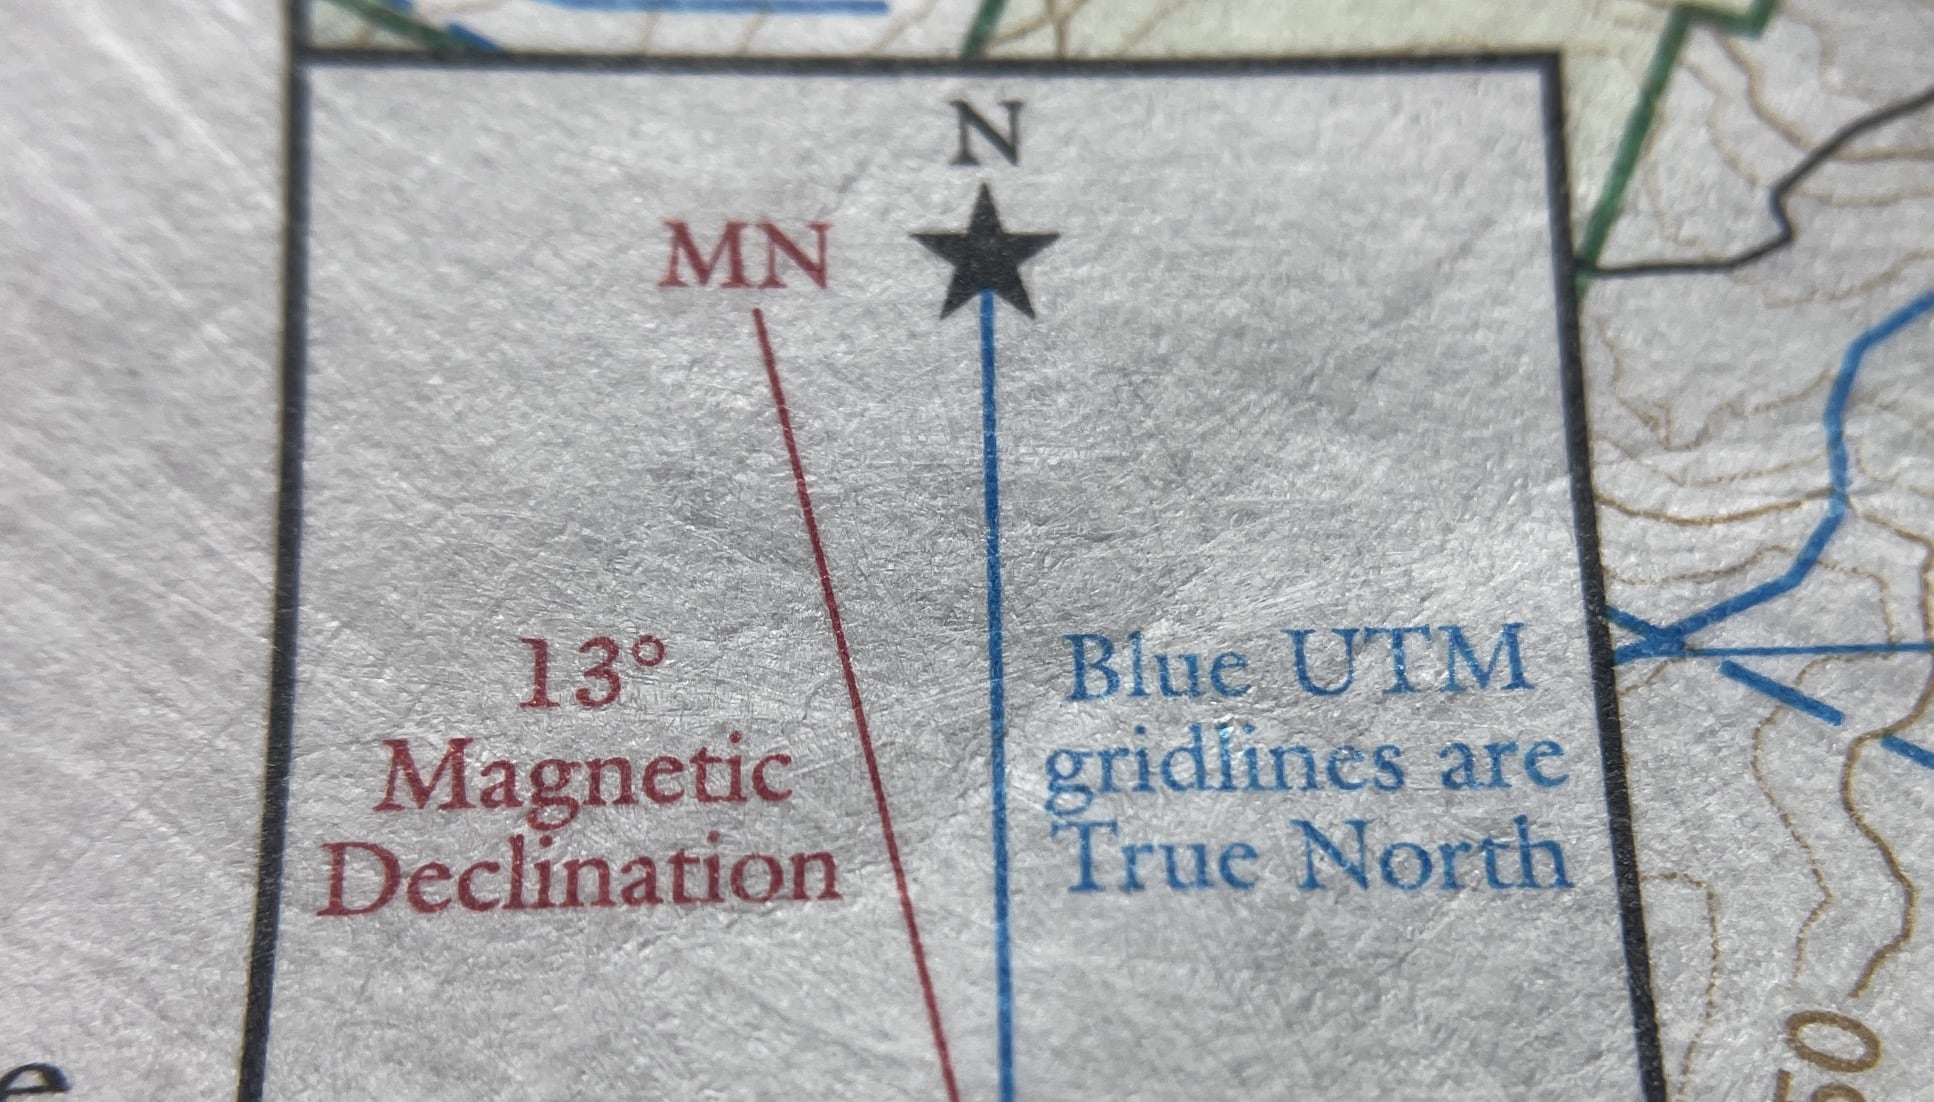
Elsewhere in the world, this value is very different. This is why you need high-quality topographic maps for any area you plan to navigate with a map and compass. (Thanks to NYNJTC for allowing me to use their amazing maps for this tutorial.)
Okay. 13° West. How do we use this piece of information? Read on…
It’s easy to remember…
If Magnetic North is to the LEFT of True North, turn your dial to the LEFT (counter-clockwise). If Magnetic North is to the RIGHT of True North, turn your dial to the RIGHT (clockwise). The mnemonic for this is: “West is best / East is least.”
In our example, magnetic north is to the west/left of true north, so we will turn our dial 13° to the left. This adds to our initial bearing: 247 + 13 = 260°.
For now, you no longer need your map — and the bearing itself is no longer very important either because…
Your compass is ready to use!
STEP 3: USING YOUR COMPASS
First, hang the compass around your neck. Good job. 50% done.
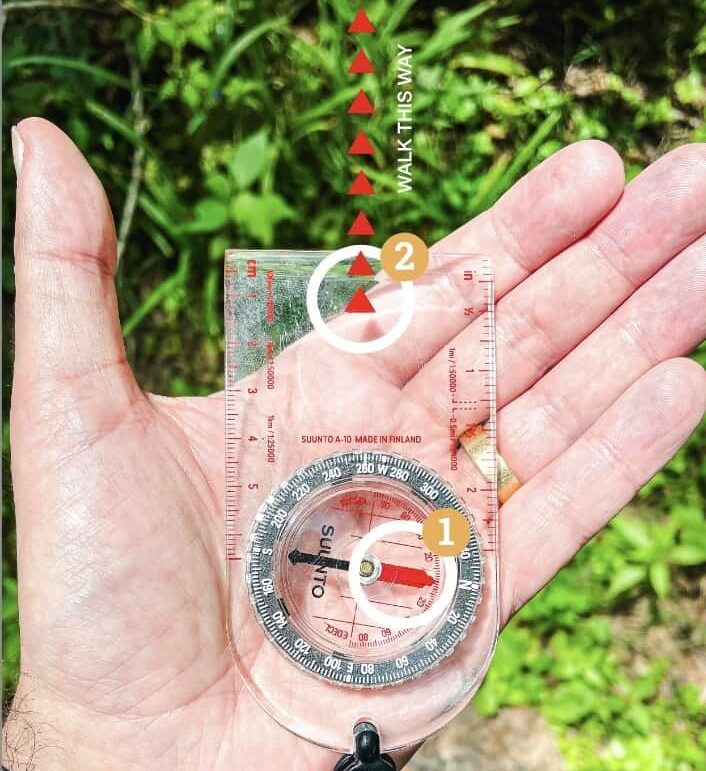
Second, whenever you want to check which way to walk, hold the compass in your hand and turn your body until red is back in the shed1. Then simply follow the direction of travel arrow2.
That’s it! 100% done!
You just learned how to use a compass. Remember, practice makes perfect. The more you practice navigating with a map and compass, the more confident you’ll become in your navigation skills.
Get the Step-by-Step Visual Guide
If you’d like an even more thorough walk-through of the whole process — with clearly labeled photos of every single step — grab this step-by-step visual guide from my Ko-fi store…
“As a very active senior citizen Catskill mountain hiker I would highly recommend your map and compass navigation skills guide. It refreshed my memory of a long forgotten skill in 10 minutes. It’s the best 12 bucks I’ve spent in a long time.”
— Bob G.
You’ll also learn…
- The best compass to buy
- How to deal with magnetic interference
- How to think about terrain issues
- How to navigate in low visibility (e.g. thick fog and dense forest)
- The individual part names of your compass
The step-by-step visual guide is designed in 9:16 aspect ratio as a PDF, perfect for reading on your phone. This is independently produced content with excellent reviews. Buy it here. I appreciate your support.
Frequently Asked Questions
How do you read a compass for beginners?
There are only three steps. This guide shows you how to read a compass correctly. The Step-by-Step Visual Guide breaks it down even further, with more detail and clear photographs of each step.
How to use a compass for orienteering?
The process is the exact same as shown above. A compass is used in combination with a topographic map to orient yourself and direct your travel.
How do you find north on a compass?
The red needle always points north. Just make sure to hold it away from any other metal.
Does a compass always point north?
In the absence of any magnetic interference, the red needle on every compass always points north.
Which arrow do you follow on a compass?
When used correctly, the red arrow always points north.
Read More
BTW, you might also enjoy…
- ADK › Whiteface Mountain via Marble Mountain
- DANGER › 6 Feet Under? How Our Adirondack Hike Turned Deadly Serious (Substack)
- ADK › Hurricane Mountain Fire Tower
- CATSKILLS › Catskills Fire Tower Challenge 2025
- Follow › My Instagram @TotalCatskills
- Follow › My writing for Times Union
Get full access…
Get instant access to the full version of this site and enjoy great supporter benefits: full galleries, full trail notes, early access to the latest content, and more.
Hot on the website right now…
Follow for more…
Follow my @TotalCatskills content on Instagram for regular hiking inspo and safe, inclusive community.

One response to “How to Use a Compass”